HOW TO SET UP A PINT-SIZED PUBLIC ADDRESS SYSTEM
Hi! This is Jamie Hill writing. I’m Shannon’s husband, and also I’m a record producer and mix engineer. Since I’m responsible for the technical side of our little operation, I got put in charge of writing this page. It’s nice to meet you.
If you’re here because you followed the link in our book – welcome. Thanks for stopping by. If you’re here because you’re clicking around on the website, then welcome to you too. In the house concert book we have a section on how to put together a great little starter PA for doing house concerts; here is some additional information on how to set that up and dial it in. Enjoy …
1. Family Portrait
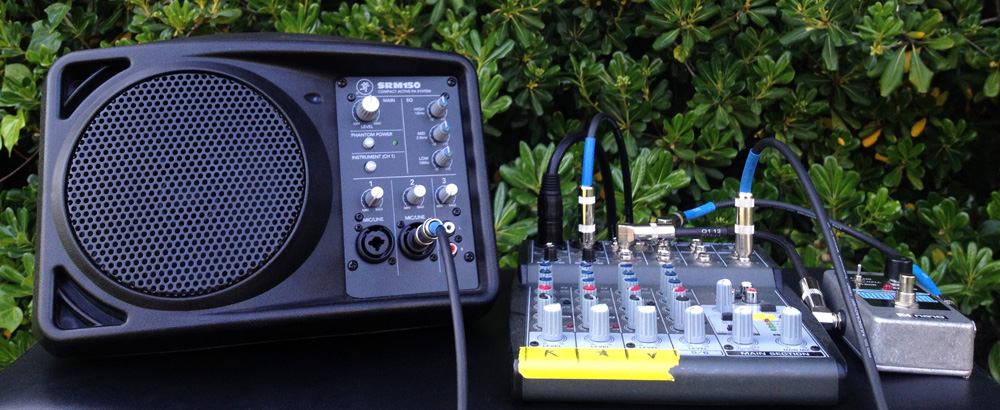
This is it! This is the whole PA. I staged it on Shannon’s piano bench, to illustrate the astonishing fact that this entire PA fits on a piano bench. Wild, right?
From left to right, we have:
- Mackie SRM150 powered speaker
- Behringer Xenyx802 mixer
- Electro-Harmonix Holy Grail Nano reverb pedal
We go into more detail in Shannon’s book about why we chose these specific pieces of gear, but to sum up: they sound great, they put out a lot of good-quality, clean sound, they give you good flexible control over your sound, and they’re very small. We’re not being paid by any of these companies to hawk their gear; we bought these pieces with our own money when we were first starting out in house concerts, after doing a bunch of research, and we’re recommending them because they worked great for us.
2. Overview
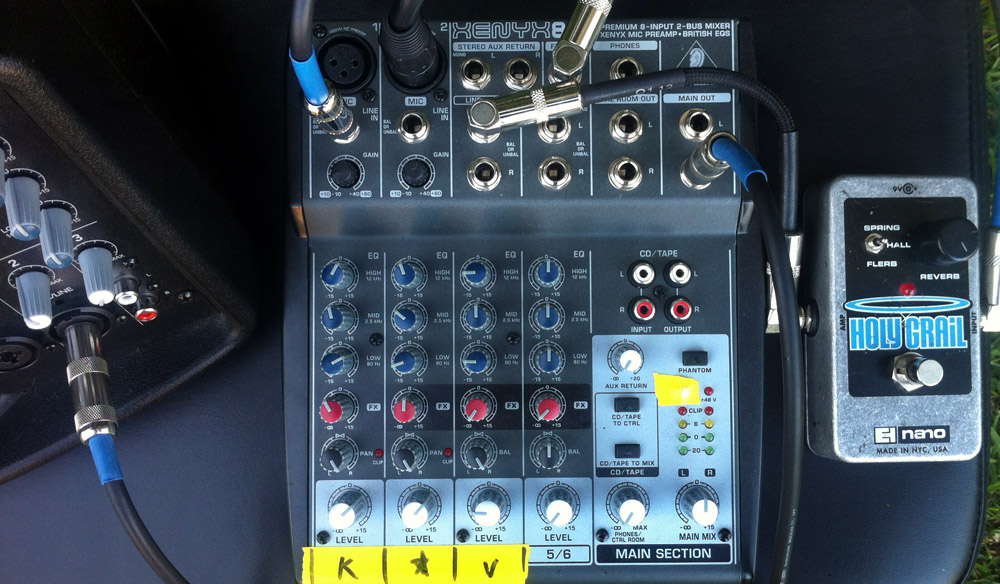
This is how things look from the top. Super simple. Shannon plays a keyboard and sings, and we have reverb on both the keyboard and the vocal to make things dreamy. And as you can see, that’s how we have things plugged in: K / star / V = keyboard / vocal / reverb. Note that even though we only have three inputs, we labeled them. Trying to remember what’s what in the dark when you’re tight for time is a recipe for turning the wrong knob, aka disaster.
If you look at the Main Outs, at top right on the mixer, you’ll note that we only use the right output. This is because the powered speaker that we’re plugging the mixer into is mono (you can see the other end of this cable going into said powered speaker, at left). You’ll also note that we’ve panned all our channels to the right (check out the black knobs on the mixer), so they’re all going fully into the output we’re using. No sense in having half the signal not be used and then have to turn everything up that much more. That’s a recipe for feedback.
Your Main Mix volume knob (the white knob at lower right) should always be at 0 (straight up, like in the picture). Why? Because that way when you turn your mixer volume all the way down after soundcheck (more on this later), you’ll know right where to put it back to before you start your show. Also, for technical reasons that are beyond the scope of this discussion, it’s best not to add or subtract volume with the master volume knob. Use the individual channel gains to get your levels right.
If you’re wondering what the other little piece of yellow tape over to the right is for, it’s to cover the “power on” light. That little light is bright in a dark space. A silly design oversight. But easily remedied.
3. Inputs and gains
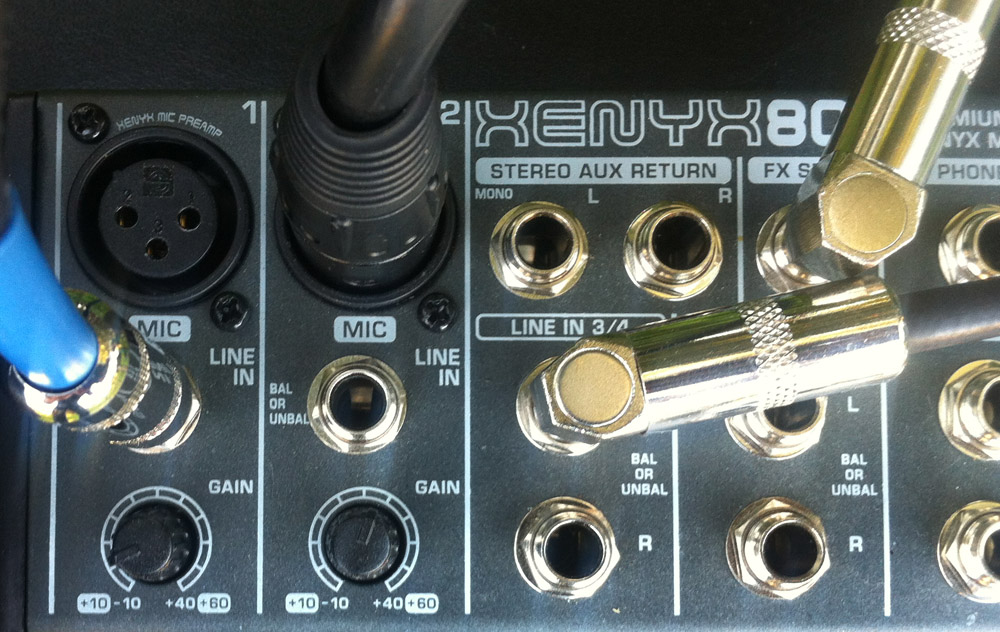
Here’s a closeup of our mixer’s input section. The keyboard is in channel 1, in the line input. The vocal is in channel 2, in the mic input. The reverb return is in the left side of stereo channel 3/4 – if you plug something into only the left side of a stereo input on this mixer, it acts as a mono input (this is pretty standard behavior). Note that the stereo channels on little mixers like this typically don’t have input gain controls – they’re fixed at “line level” input strength. This is fine – you can just control the level of the reverb with the channel’s volume knob.
Why do we return the reverb to a channel, instead of into the Aux Return just above? Because I like to EQ my reverb return. You’ll see a closeup of my EQs a little further down the page, where I’ll explain this a bit further.
Eagle-eyed readers will have noticed that I run the gain a little hot on Shannon’s mic. This is so when she sings lower in her register, she can get up close on the mic and it still has a nice rich, present quality. Then when she’s singing in fuller voice, she pulls back off the mic, sometimes a lot!
The final cable you see, at top right, is going out of the FX Send jack, into our reverb. Which brings us to:
4. The Reverb Pedal
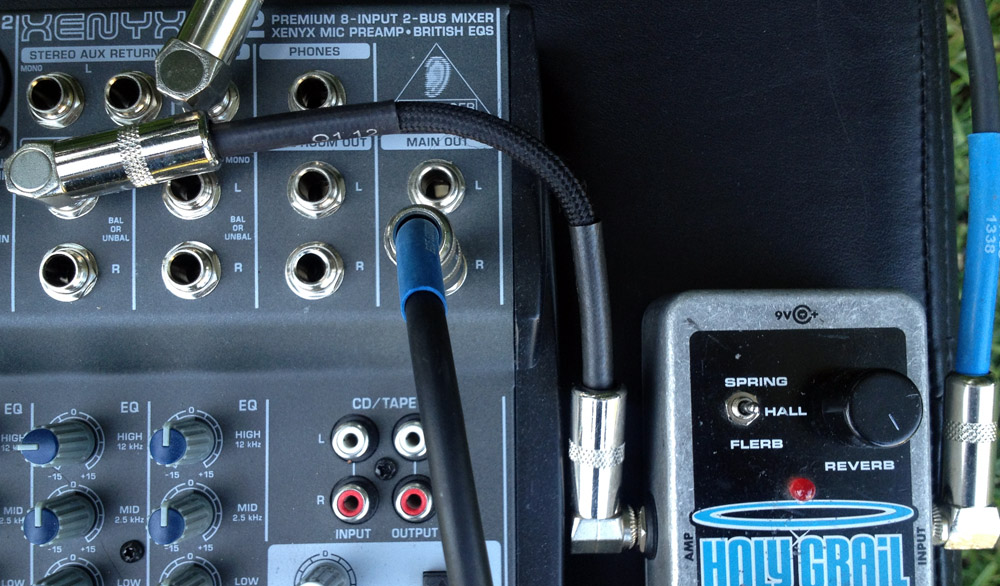
Here you can see the connections for wiring the reverb pedal into the board. I’m sure some of you are thinking, “What the heck are they using a guitar pedal for? That must sound terrible!” And, you’re right, some guitar pedals wouldn’t work that great for this sort of application. But the fine folks at electro-harmonix had the good sense to put a buffered input stage in their pedals, so you can run line-level signals through them and it sounds really good.
We’re running the reverb in a “send-return” configuration. We’re sending to it from the FX Send (at top left), into the reverb’s Input jack at far right. Then we’re returning the pedal’s output (labeled Amp) back into the left/mono input of stereo input 3/4.
Note that we use right-angle cables for making these connections. They save a LOT of space.
5. Mixer Section
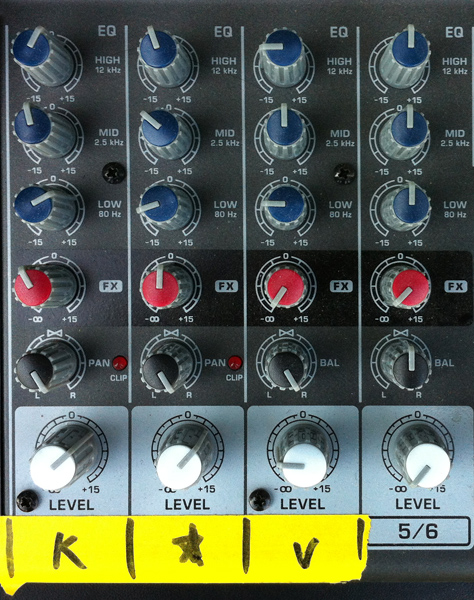 Here’s where we balance everything out. This is how the EQ sounded good at our last show, so this is where the knobs were when I took the mixer out for photos. I want to underscore that this is not necessarily what will sound good for you! But I will explain why these settings were working for us.
Keyboard: Pretty self-explanatory. A little extra oomph on the low end, a little extra sparkle on the top end, and a little cut in the aggressive part of the spectrum at 2.5kHz.
Vocal: I do want to point something out here. Remember a couple of photos ago when I let on how I put a little extra gain on the mic so Shannon can come up on it in soft sections and still have presence? Well, when you come up on the mic, things can get boomy fast, as I’m sure you know. So I roll a good amount of the low end off the mic’s channel on the mixer to compensate. It’s a balancing act: you don’t want it boomy or muffled-sounding, but you don’t want it thin either. Experiment to find the balance that works best with your voice to give it the clarity you want at close range.
You’ll note that I also tend to cut some at 2.5kHz to get some of the “bite” out of Shannon’s voice. I think it’s important in a house concert setting (heck, in any live music setting) that the sound be pleasant and not aggressive, so I’d suggest you pay attention to that. If you’re indoors, sheetrock and tile flooring can really bring out the frequencies around 2.5kHz, so you may need to turn this knob down more than you’d think. Conversely, if you’re playing on grass, you might need to crank this knob or your voice will sound dull and lifeless. Your performance space will change every night, so these knobs’ settings will probably change some every night too.
Reverb return: The EQ on this channel is set as per an old studio trick – sometimes reverb fits better if you take some of the low end and high end off it. That way it’s not competing with the body or the presence of your voice, but rather sitting behind your voice and enhancing it. As alluded to previously, this is why I bring the reverb back into a channel as opposed to the Aux Return – so I can shape the sound further with the channel EQ.
Note that the volume for the reverb channel is down lower than ideal (generally you want your channel volumes around zero, give or take). Why? Because Stereo Input 3/4 is a fixed line-level input, and there isn’t an input gain control. So I have to turn down the channel volume instead.
FX sends: As previously mentioned, we put reverb on both the keyboard and the vocal to create a dreamy feel – a little less on the keyboard. The red knobs on the first two channels reflect this.
Could you put the reverb return’s channel volume at 0 and send half as much signal from each of the red FX send knobs? Yes you could. Find what sounds best with your equipment.
6. The Powered Speaker
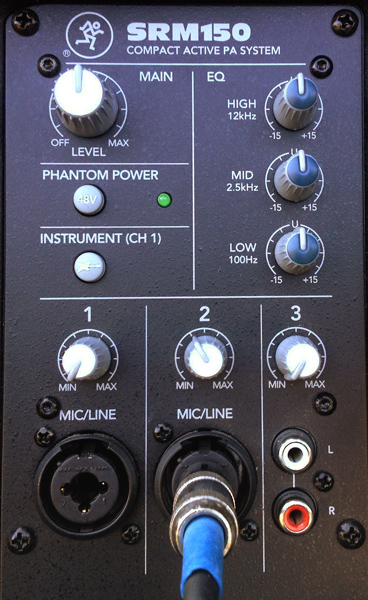
This is the front panel of our powered speaker, aka “The Little Mackie.” (The speaker part would be just to the left if I hadn’t cropped the photo so close.) It’s gloriously straightforward. A few notes:
As you can see, The Little Mackie has a 3-band EQ of its own. I treat this as a sort of “master EQ” to sculpt the overall sound, if need be. I always start each night with this EQ flat, like in the picture, and in soundcheck I do my best to get things sounding great without using this EQ. But if it seems like the whole mix needs, say, a little more body, or a little less high end, then I might make that adjustment here as opposed to doing it on each channel on the mixer. If you find yourself turning up the low EQ on all the channels on your mixer, then it might be better to turn them back down and turn the low EQ up here. Whatever works best.
I always run the Main volume at noon (upper-left knob). I start the channel input that the mixer Main Out is plugged into at 11:00, as shown to the right on channel 2, which seems to be a decent starting place for most situations. If you’re in a small living room, then maybe give the channel input a little less juice; if you’re outdoors, maybe a little more. Again, this is where you’re making overall changes to your volume for the night. Don’t change the Main Mix out on your mixer – leave that at noon and change the volume here instead.
Note that channel 3 is designed for plugging your phone into (via a $9 adapter cable, that is) – and that’s exactly what we used it for. The mixer has a similar input, but we don’t use it. Why? Because that way after soundcheck we can turn the mixer’s Main Mix volume all the way down, which effectively turns off the keyboard and mic until showtime, and we can still play music through The Little Mackie. It’s a great way to do things.
Got any questions? Feel free to get in touch with me at jamie@secretagentaudio.com.
